


AWS Application Load Balancer Authentication with SAML IdP
December 31, 2018User authentication is a common application requirement that has been solved numerous times in the past - why trouble yourself with implementing and managing it yet again, when you could be working on exciting new features in your application instead? The AWS Application Load Balancer (ALB) can greatly simplify user authentication with several different social media, SAML 2.0, and OpenID Connect identity providers (IdP).
In this post, we'll walk through the entire process of setting up ALB authentication using Amazon Cognito against a Microsoft Active Directory Federation Services SAML IdP.
Getting started
Let's first take a high-level look at what we're trying to achieve. We have an application with functionality that requires a user to be authenticated. When our application is accessed, we'd like to redirect users who haven't already authenticated over to our SAML IdP. There, they can log in against an existing database of users, and the IdP will post a response to a callback URL that we provide to let us know that the user authenticated successfully. If so, they can proceed to the application; otherwise, they will continue to be denied access.
This walkthrough assumes we'll be authenticating against our company's Microsoft Active Directory Federation Services (ADFS), but the same overall procedure should be adaptable to any compatible SAML IdP. Before we proceed, we'll assume we already have the following:
- An application hosted at
https://app.example.com/and sitting behind an existing Application Load Balancer (ALB). - A subdomain we can use for authentication, e.g.
auth.app.example.com. - An AWS Certificate Manager issued certificate for
app.example.comandauth.app.example.com. - The metadata document endpoint URL for our SAML IdP, e.g.
https://example.com/FederationMetadata/2007-06/FederationMetadata.xml.
Of course, throughout this walkthrough, you should replace instances of app.example.com with your application's actual domain name.
NOTE: While this post makes a few assumptions about your current environment, a precise match is not absolutely necessary. For instance, if you don't have the ability to create a subdomain for authentication (auth.app.example.com), you can adapt the instructions below to work with the Amazon Cognito domain URL that is available when creating the user pool. Or, perhaps you have an application, but don't have an existing ALB. If so, rather than modifying an existing ALB, just create a new one taking the information in this post into consideration.
Creating the Cognito user pool
Amazon Cognito lets us avoid having to implement the necessary logic to negotiate the user authentication flow, manage state, and capture available user information. Let's begin by creating a new user pool:

For the Pool name, choose something descriptive. Because this user pool is for https://app.example.com/, we'll name it "Example".
Next, click Step through settings. We will be leaving most of the settings at their default values. However, it's good to look them over if you're not already familiar with Cognito in order to get a sense of what is possible.
The first section, How do you want your end users to sign in?, can be left alone because users will be signing in via ADFS. The next section, Which standard attributes do you want to require?, needs careful consideration. Pay close attention to the highlighted text in the screenshot below:

There are a number of standard attributes like email and name that ADFS can expose in the authentication response in the form of claims. These checkboxes do not specify which claims will or will not be exposed, nor do they control how those claims map to these standard attributes; the checkboxes simply indicate whether or not any of these standard attributes are required in order for a user to sign up. Unfortunately, we must make these decisions at the time the user pool is created! We cannot make additional attributes required, nor can we change our minds about a required attribute suddenly becoming optional. Doing so requires the user pool to be recreated, which will also require configuration changes in ADFS for the new user pool identifier.
Until such time that Cognito allows these settings to be modified after the user pool is created, I recommend not setting any attributes to be required at this point. If we do end up needing certain attributes to be required, we can enforce this either within the application or within Cognito using Lambda triggers. For this post's example, we'll leave all fields unchecked.
We can also choose to create optional, custom attributes under Do you want to add custom attributes? Custom attributes, while optional, cannot be removed from the user pool after creation. For this example, we won't create any.
Because we'll be using ADFS exclusively for authentication and implicit sign-up, we can leave the default options on the next several screens by clicking Next step. We will be creating an app client as part of this process, but there are several configuration values that need to be set that the AWS console will not let us fill in until the user pool is actually created. So, when we reach Which app clients will have access to this user pool?, we'll click Next step again to get past that as well. Other than setting any standard attributes as required, we can make any changes we need after the user pool is created.
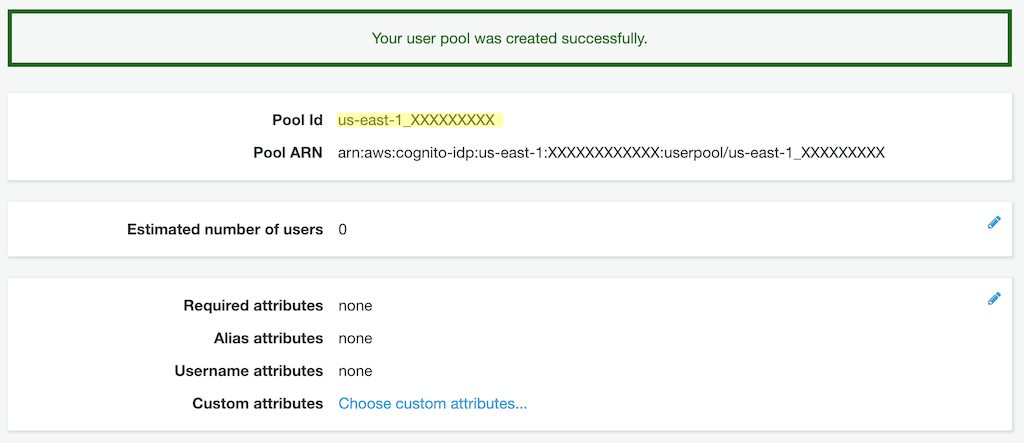
Finally, we Create pool, and make note of the Pool Id, which we'll will need later.
Before we move on to creating the app client, we'll need to create an Identity provider to associate to it when configuring the app client.
Setting up the SAML identity provider
Start by clicking Identity providers on the left menu under the Federation and selecting SAML. Then, supply either the metadata document URL (e.g. https://example.com/FederationMetadata/2007-06/FederationMetadata.xml) or upload the metadata document if your SAML IdP does not publish it anywhere publicly accessible. Consult your IdP's documentation, or if you're using your own company's ADFS like I did for this example, check with one of your system administrators.
After inputting the metadata document, enter a name for the provider. If your IdP supports sign out flow and you wish to enable it, you can do here. You can also add any IdP identifiers, if needed. When finished, click Create provider.

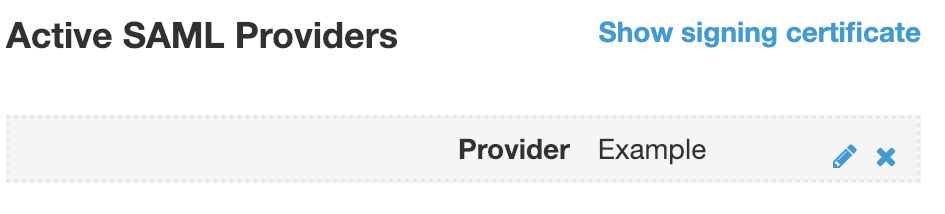
You should now see the provider listed under Active SAML Providers.
Next, we can set up Attribute mapping between the claims exposed via ADFS responses I mentioned earlier and attributes within the user pool. To do so, click Attribute mapping under Federation in the left menu.
Here, we can add several SAML attributes that we want Cognito to capture from the ADFS claims and store permanently. In the screenshot below, I'm capturing the name and emailaddress claims and mapping them to the standard Name and Email attributes. If you created any custom attributes earlier, they would appear in the User pool attribute dropdown with the custom: prefix.
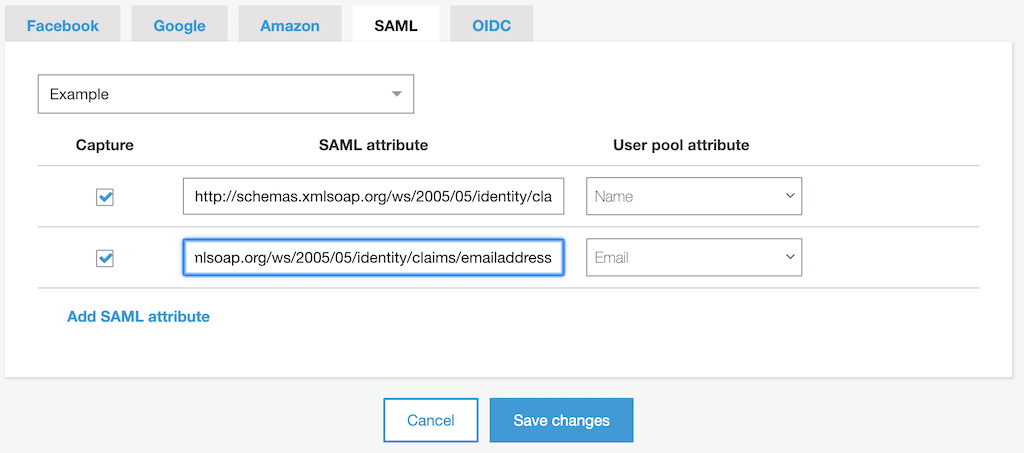
To see which claims are available to you, have a look at your IdP's FederationMetadata.xml file and look for tags in this format:
<auth:ClaimType
  xmlns:auth="http://docs.oasis-open.org/wsfed/authorization/200706"
  uri="http://schemas.xmlsoap.org/ws/2005/05/identity/claims/emailaddress"
>
  <auth:DisplayName>Email</auth:DisplayName>
  <auth:Description>Email address of the user.</auth:Description>
</auth:ClaimType>
NOTE: You must specify the full uri in the SAML attribute input - the simple name or emailaddress identifiers will not suffice.
Let's move on to creating our app client!
Configuring the app client
We'll need an app client to represent our application within. Click App clients on the left menu under General settings, then click Add an app client to begin creating one. For this example, we just need to enter a name. The rest of the settings can be left at their defaults.

After the app client has been created, click App client settings under App integration in the left menu to configure it. We'll need to make sure that our Example identity provider is enabled, the Callback URL is entered correctly, and that Authorization code grant and openid are checked under the OAuth 2.0 settings. For ALB authentication against an ADFS SAML IdP, the Callback URL must be in the form https://<application domain>/oauth2/idpresponse. The <application domain> corresponds to the domain where your application is accessed. In this case, we're using app.example.com.

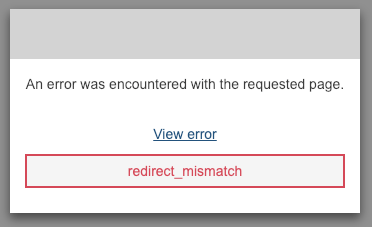
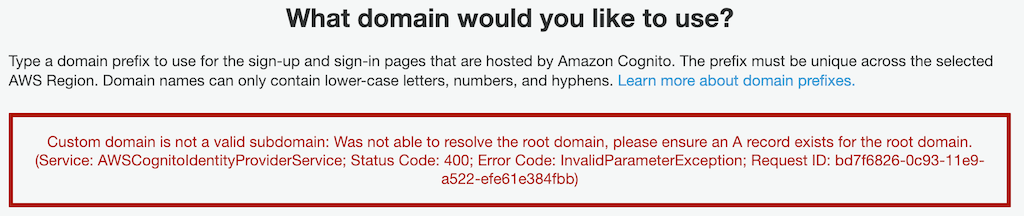
Pay special attention to the Callback URL. A small typo, or omission of the /oauth2/idpresponse path portion, easily result in a great deal of lost time to troubleshooting. If at any point throughout or after this tutorial you encounter the cryptic error message shown below, there's a good chance an incorrect Callback URL is the cause!
We're almost done with Cognito. The last item on our agenda is choosing a domain.
Choosing the Cognito domain name
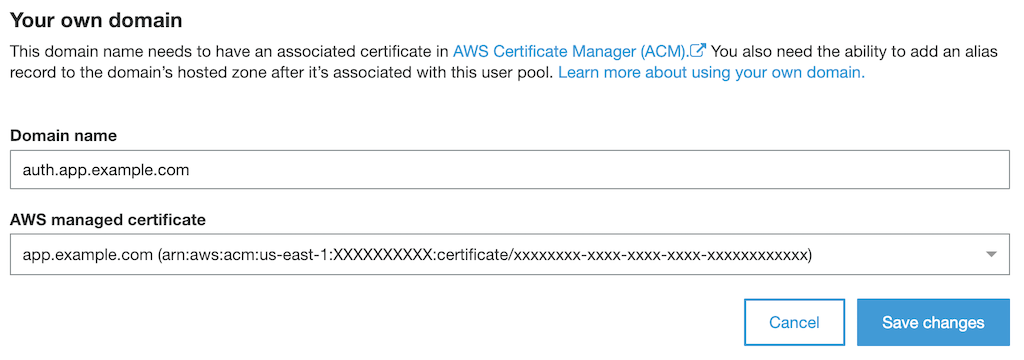
The domain in this case isn't the domain of the application - it's the domain for the sign-up and sign-in pages used by Cognito itself. In this tutorial, we're going to use the custom subdomain (auth.app.example.com) mentioned at the start. If you don't have the ability to go that route, enter a Domain prefix in the Amazon Cognito domain section. If it's available, you can use it to create an https://<your domain prefix>.auth.us-east-1.amazoncognito.com domain instead.
To use a custom domain, we'll skip past the Amazon Cognito domain section, and enter our custom authentication subdomain and select our previously created ACM certificate:
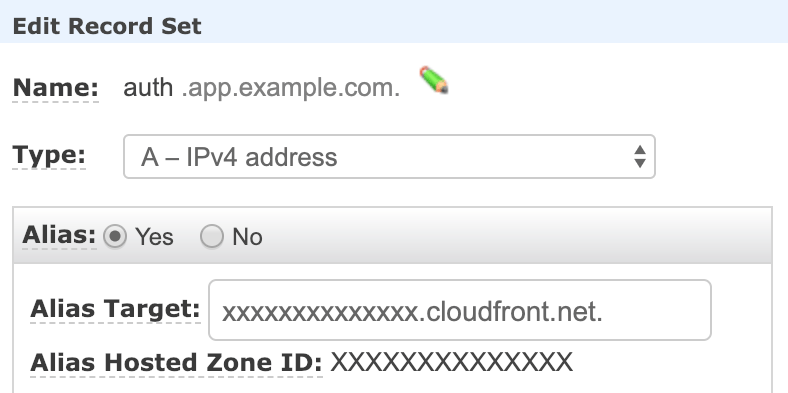
NOTE: We technically don't need to have a real application yet in order to set up ALB authentication, but the custom domain step above will fail if the parent domain does not have an A record associated with it:
If you're working on setting up authentication prior to beginning work on the application itself, you can work around this limitation by creating an A record in your DNS configuration for the parent domain name that points to a valid IP address that won't actually lead anywhere (such as 0.0.0.0).
Otherwise, you can expect to see the following when you click Save changes:

Make note of the Alias target and add an A record for auth.app.example.com with that as its target. Here's what the record set would look like if you're using Route 53 for DNS:
Configuring ADFS
This post assumes you're merely a consumer of the SAML IdP and not the administrator. Before proceeding, you should contact your ADFS administrator and ask them to add the new ADFS configuration for your application. They will need the following information to do so:
- Audience URN:
urn:amazon:cognito:sp:us-east-1_XXXXXXXXX - Post binding:
https://auth.app.example.com/saml2/idpresponse - Claims to provide:
http://schemas.xmlsoap.org/ws/2005/05/identity/claims/namehttp://schemas.xmlsoap.org/ws/2005/05/identity/claims/emailaddress
Substitute the example values provided above with the actual values from your Cognito user pool, custom domain, and FederationMetadata.xml.
We're now ready to configure the Application Load Balancer.
ALB authentication
This tutorial assumes you already have an ALB pointing to your existing application, so I won't cover how to create one - only how to add authentication. ALB authentication is only available for HTTPS listeners, so if your application isn't already sitting behind an ALB listening for HTTPS requests, you will need to rectify that before proceeding.
Adding authentication to the ALB is fairly straightforward and requires just one default rule with two actions: "If the request hasn't already been routed elsewhere, then (1) authenticate the user and (2) forward the request on to the application target group." If all of the earlier steps were completed successfully up until now, insert a new default action in the first slot as shown below:

Then, make sure you're still forwarding the request to the application target group afterwards:
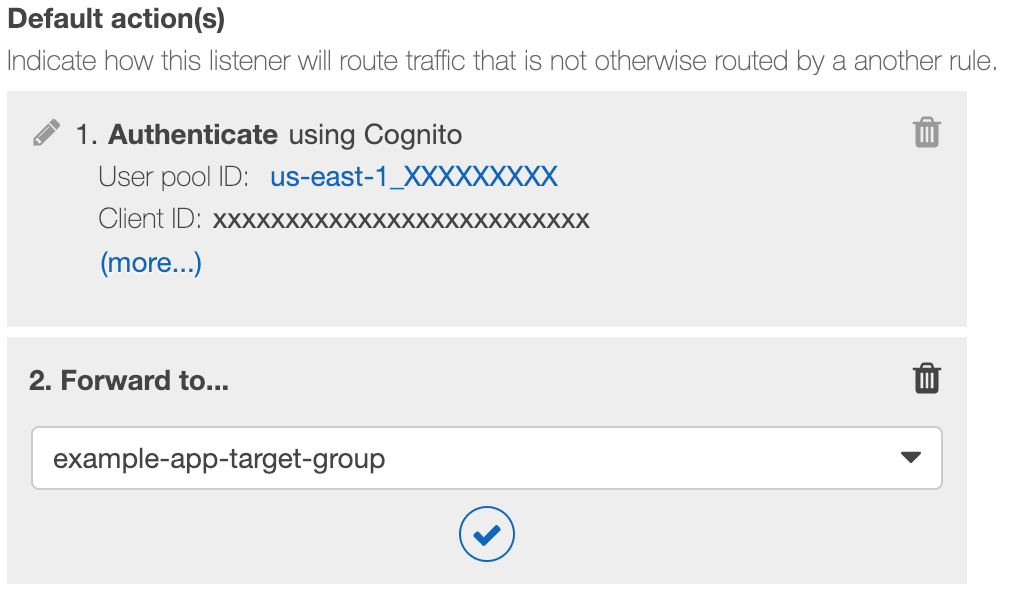
The end result will be something like this:

This setup assumes that all endpoints under your application require authentication. If that isn't the case, you can opt to either (a) add additional path-based routing rules to bypass authentication for certain pages (such as landing pages, documentation, and so on), or (b) move all secure endpoints under a specific path (/authenticated or /secure, for example) and make all other destinations not require authentication. I strongly recommend option (a), as doing so ensures that you'd need to explicitly configure a page to not require authentication.
NOTE: Since ALB authentication only works on secure listeners, you should also consider adding a listener on port 80 that will all HTTP requests to HTTPS. This isn't strictly necessary, but doing so will ensure that your users will always get to your application even if they accidentally try to access it insecurely. The port 80 listener requires just one rule:

Testing it out
After the Cognito user pool is created, the ALB listeners are configured, and the ADFS administrator confirms that the configuration for the application has been added, it's time for a test drive. Head over to any https://app.example.com/ page that requires authentication, and you will be redirected to the SAML IdP's login screen. For example:

After logging in successfully, you'll be redirected back to your application and able to access all of the secure pages!
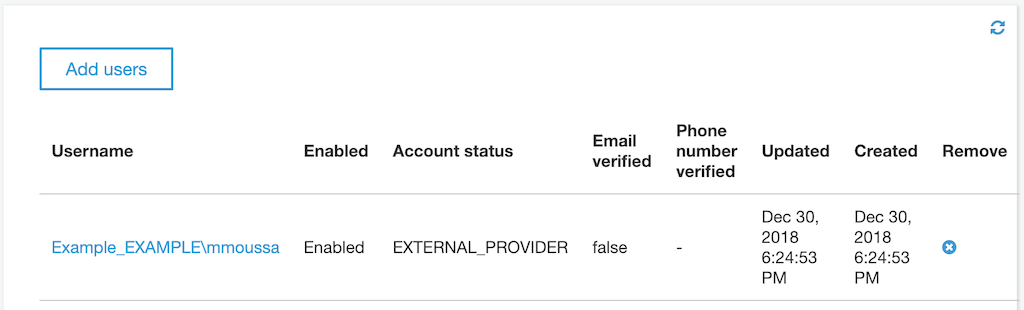
Finally, if we return to our Cognito user pool and select Users and groups under General settings, we'll find that Cognito has created a group for our users...

... and that it automatically adds users who successfully authenticate to the group:
Conclusion
In this post, we covered the basics of creating a Cognito user pool to support ALB authentication with an ADFS SAML IdP. This merely scratches the surface of what's possible in terms of application user authentication and identity management with Cognito, and I encourage you to dig into the Cognito Developer Resources that are available in order to explore further. To learn more about ALB authentication itself beyond just ADFS SAML IdPs, you can start with https://docs.aws.amazon.com/elasticloadbalancing/latest/application/listener-authenticate-users.html. You can also check out the Authentication on Application Load Balancer demo, which features links to various other resources that may be helpful.